

Colour theory in graphic design 2022
Everywhere we look we see colour. Colour plays an important part of graphic design and learning about graphic design theory.
Right now, you are seeing black and white as you read this information. It is an important part of life and plays an important role in graphic design. Colours can help us decide what food we can eat; it can alert us of danger and it also helps us make choices throughout the course of our day.
Understanding colour and the way that we see colour will help you become a better designer and artist.
What exactly is colour?
Colour is the property of what we see when we interact with light and other objects, in its simplest form light hits an object and it is either absorbed or reflected back into your eyes, light travels in waves and when the different wavelengths reach the cones of our eyes we see what we call colour or the reflected light waves from the object.
The greatest source of light in our solar system is, of course, the sun, the sun emits pure white light, it is not white at all, it is a blend of all the different wavelengths combined. When all the wavelengths combine and reflect into our eyes, we see what we call white colour, each colour as we know it is just a different wavelength.
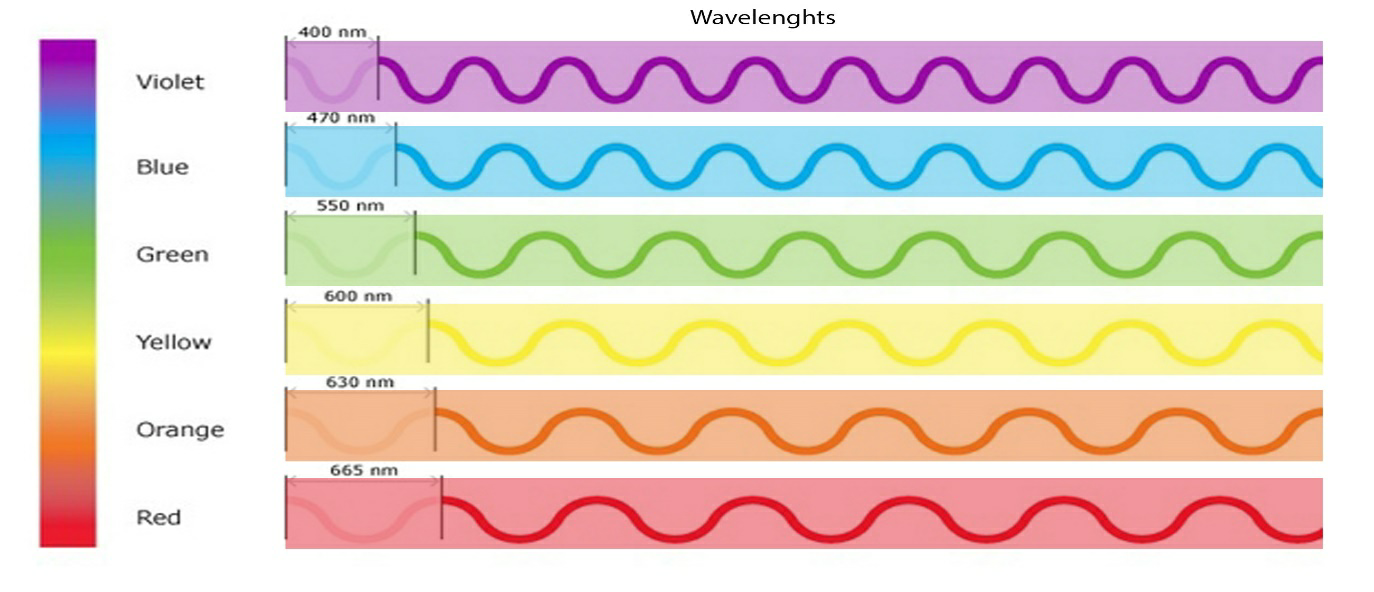
Red has the longest wavelength with a small frequency, Orange has a shorter wavelength than red, yellow is shorter than orange, then green, cyan, blue, and violet. Violet has the highest frequency with the shortest wavelength.
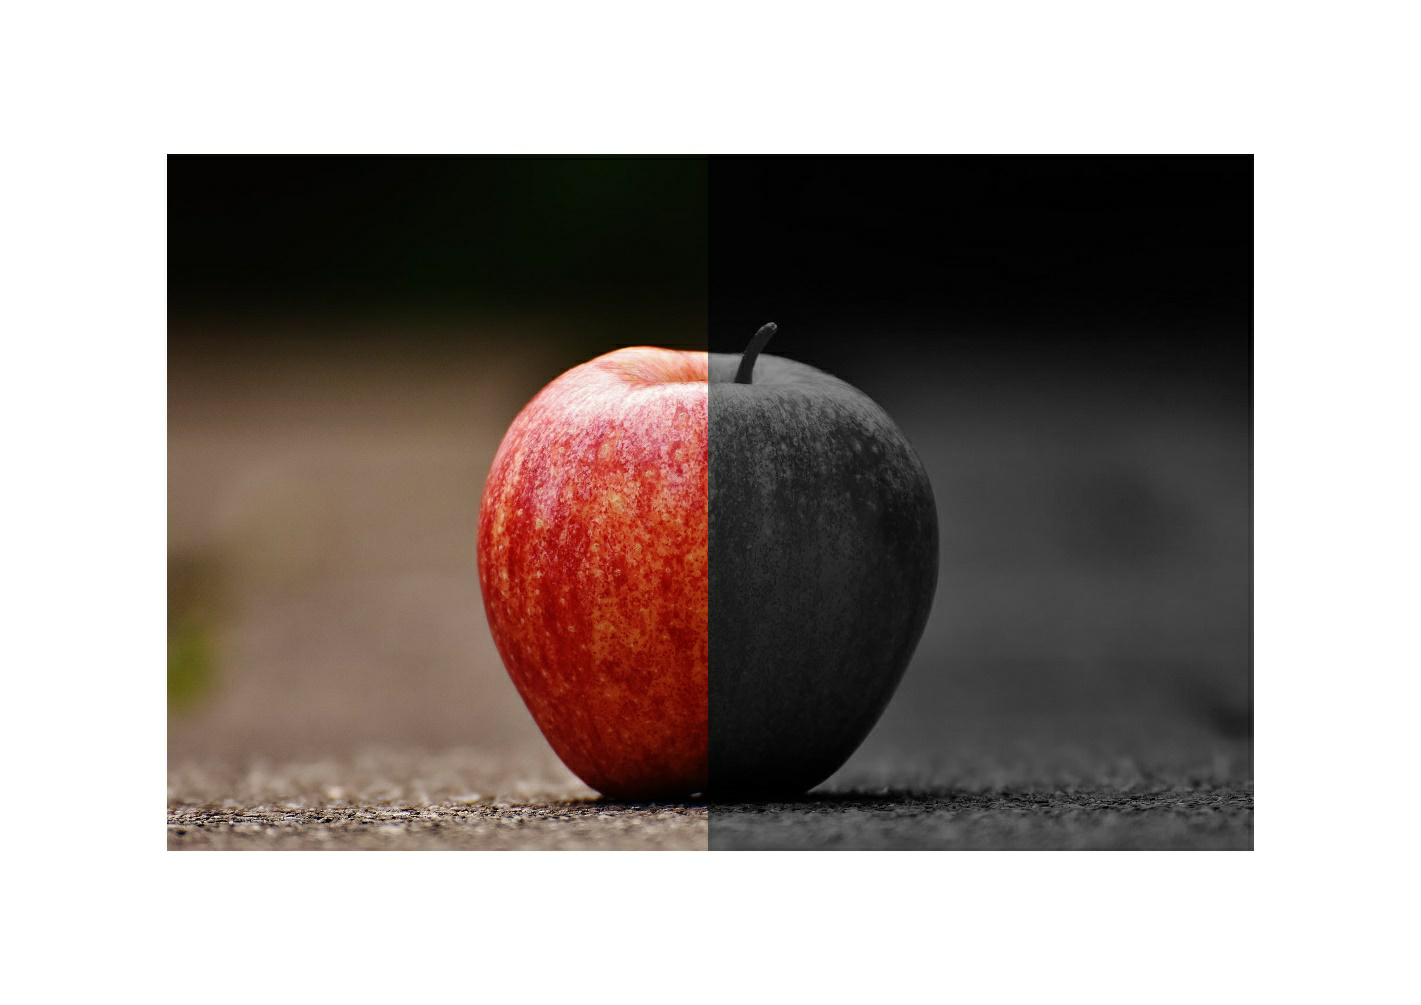
Once the wavelength gets shorter than violet, we get ultraviolet and is no longer perceived naturally by the human eye. White light is a blend of all of these wavelengths adding together as the light travels from the sun it hits different objects and those wavelengths can either be absorbed into that object or reflected back into our eyes, as light is absorbed and reflected we began to see different colours. Take for example an image of a red apple, the apple in essence isn’t really red the apple is just an object that absorbs every colour but red and that red light is reflected back to us and we interpret this as the colour red.
This goes for all the other colours on the colour spectrum, green is all colours except green reflected back to us the same goes for Orange blue violet and so on.
When we see something white it is because the object isn’t absorbing any of the wavelengths and they are all being reflected back to us, and here’s a little secret black isn’t really a colour at all we see black when all of the light wavelengths are fully absorbed into the object.
Black is just the absence of colour, however in design we need a way to describe this, so we just label it as a colour black.
The Meaning of Colour in Graphic Design – So how does this help as a designer?
By understanding the basic principles of light and colour you will have a better foundation of the way colour works in different mediums, whether through digital images through print or through any other medium available to artists.
As colour is so important to our everyday life’s it is particularly important to understand the basics of how colour works, how it can be mixed or manipulated and how you can apply it to your work?
Colours can express mood or emotion they can help draw attention to what you want the viewer to see and they can provide information to the viewer in the design itself, choosing the right colours can help express your point and choosing the wrong colours can turn the viewer away and in some cases even offend different cultures.
It is important you learn all about the colour meanings, pairing colours and choosing the right colours.
Seeing the world through colour
Look through these glasses, what do you see? What colour do you see?
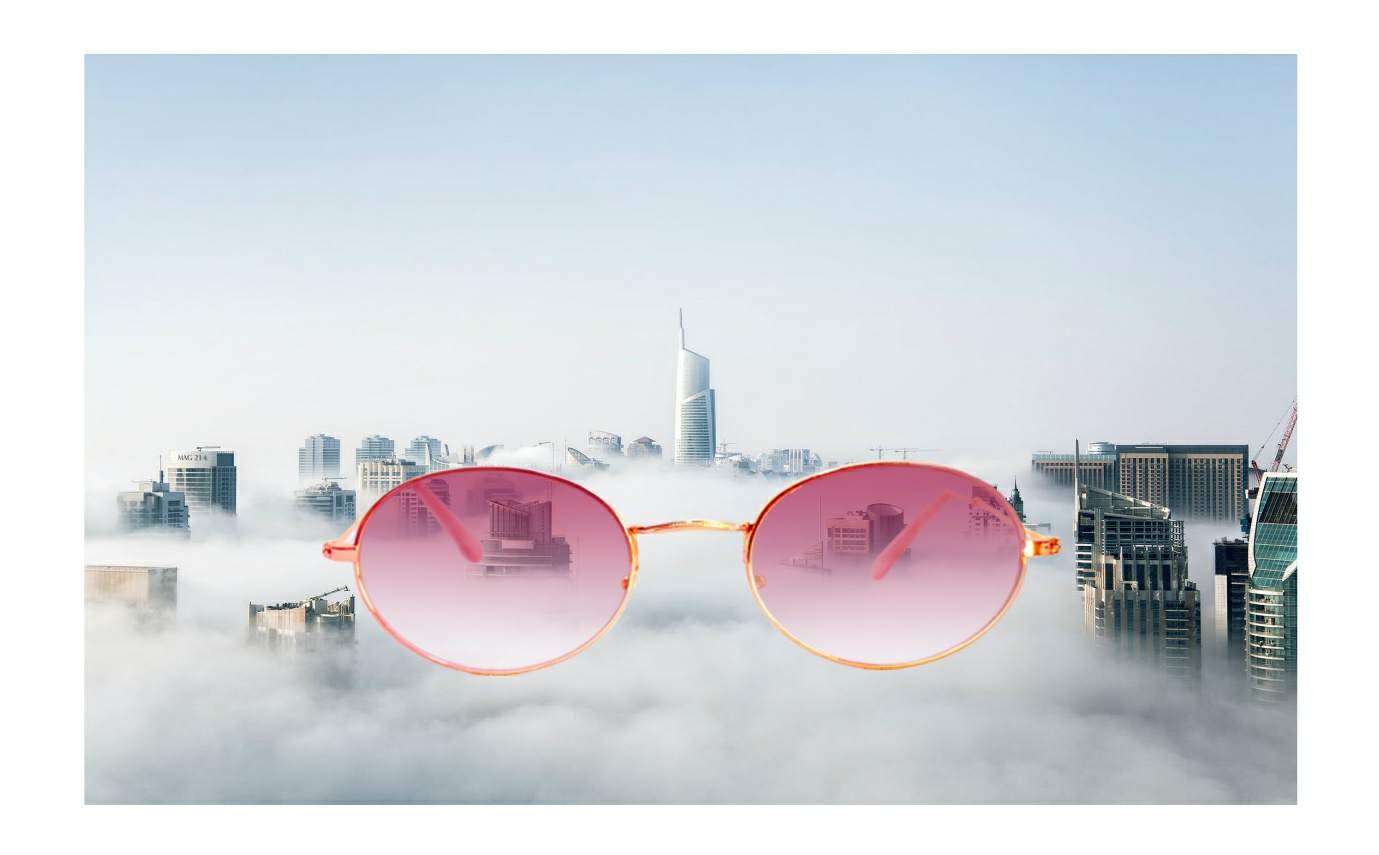
Is it red, pink, rose, blush, fuchsia, watermelon?
As we see the world around us, we understand a multitude of different colours, they are the primary colours of red, green, blue, yellow violet, and so on, but every colour has many variations of that main colour.
Based on its properties like how light or dark it is or how intense or desaturate it is we can get a full spectrum of all sorts of colour, generally we give each one of these variations a name like rose or fuchsia.
In Design each property of colour is also given a name and these properties become adjustable on an individual basis, by doing so you have complete control over every colour that we can visibly see. On this section we will go over all the common terms used to describe the properties of colour.
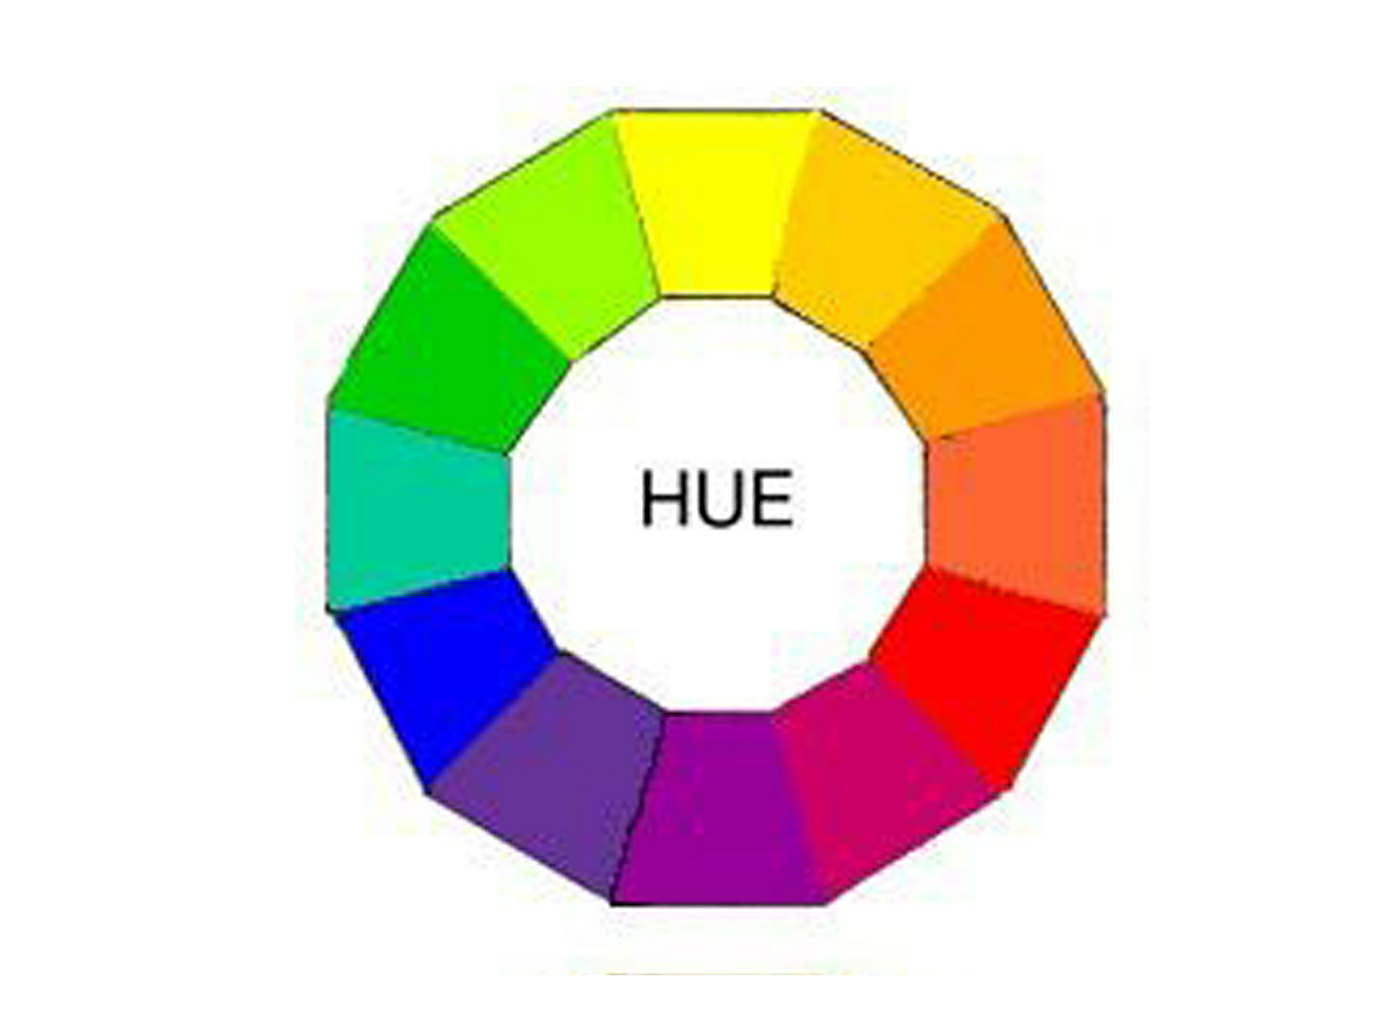
When you begin working in programs like Adobe Photoshop Adobe Illustrator you will be able to change these individual properties. Let us start first with Hue. Hue in its simplest form is what we call a colour. The Hue is the reflected light wave that we see on our eyes and name a colour, blue, yellow, green, red, and so one.
In design and in print a hue is described as a colour with no values added to it, that is the colour on its pure form, no extra white, black, or grey added to that colour.
Do we think in terms of primary colours like blue, red, yellow, green, and violet? The fact is there are actually hundreds of individual hues to choose from, when working in graphic design. Hue is the first property of a hue saturation lightness (HSL) colour wheel.

That means that in a colour model the hue is selected for its colour and then the saturation and lightness. A hue is like naming the actual colour, blue red, green or another hue.
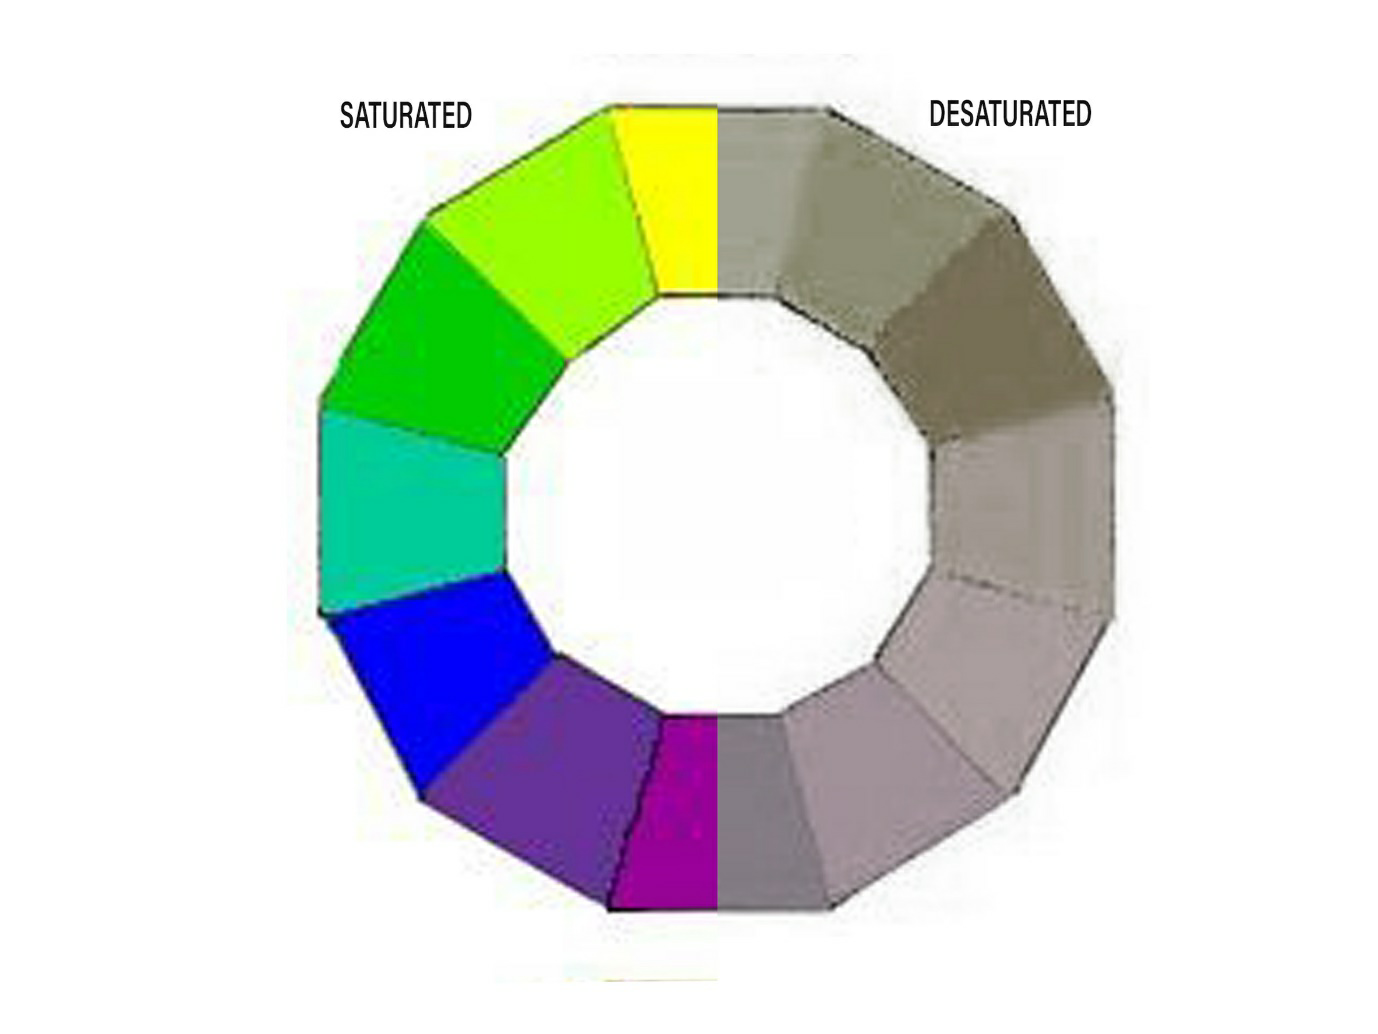
The second property on an HSL colour wheel is saturation. Saturation and colour describes the intensity of a colour and how well that colour is reflected back to us.
Colours can be highly saturated showing the purest form of its Hue or it can be desaturated until it gets to a point of having grey tones until you no longer have a colour.

The more the colour is saturated the more intense the colour will appear.
The final two properties of a colour model describes how light or dark a colour is.
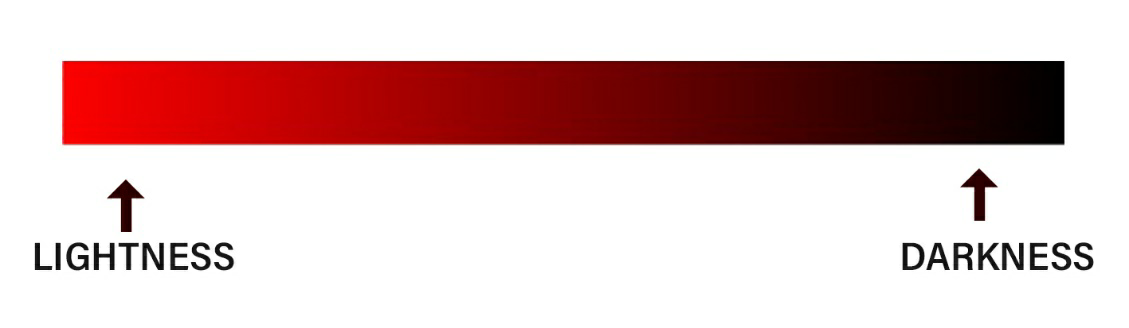
The lightness and darkness of a colour in printing or in painting is controlled by using various shades of blacks, white, or greys in your colour.
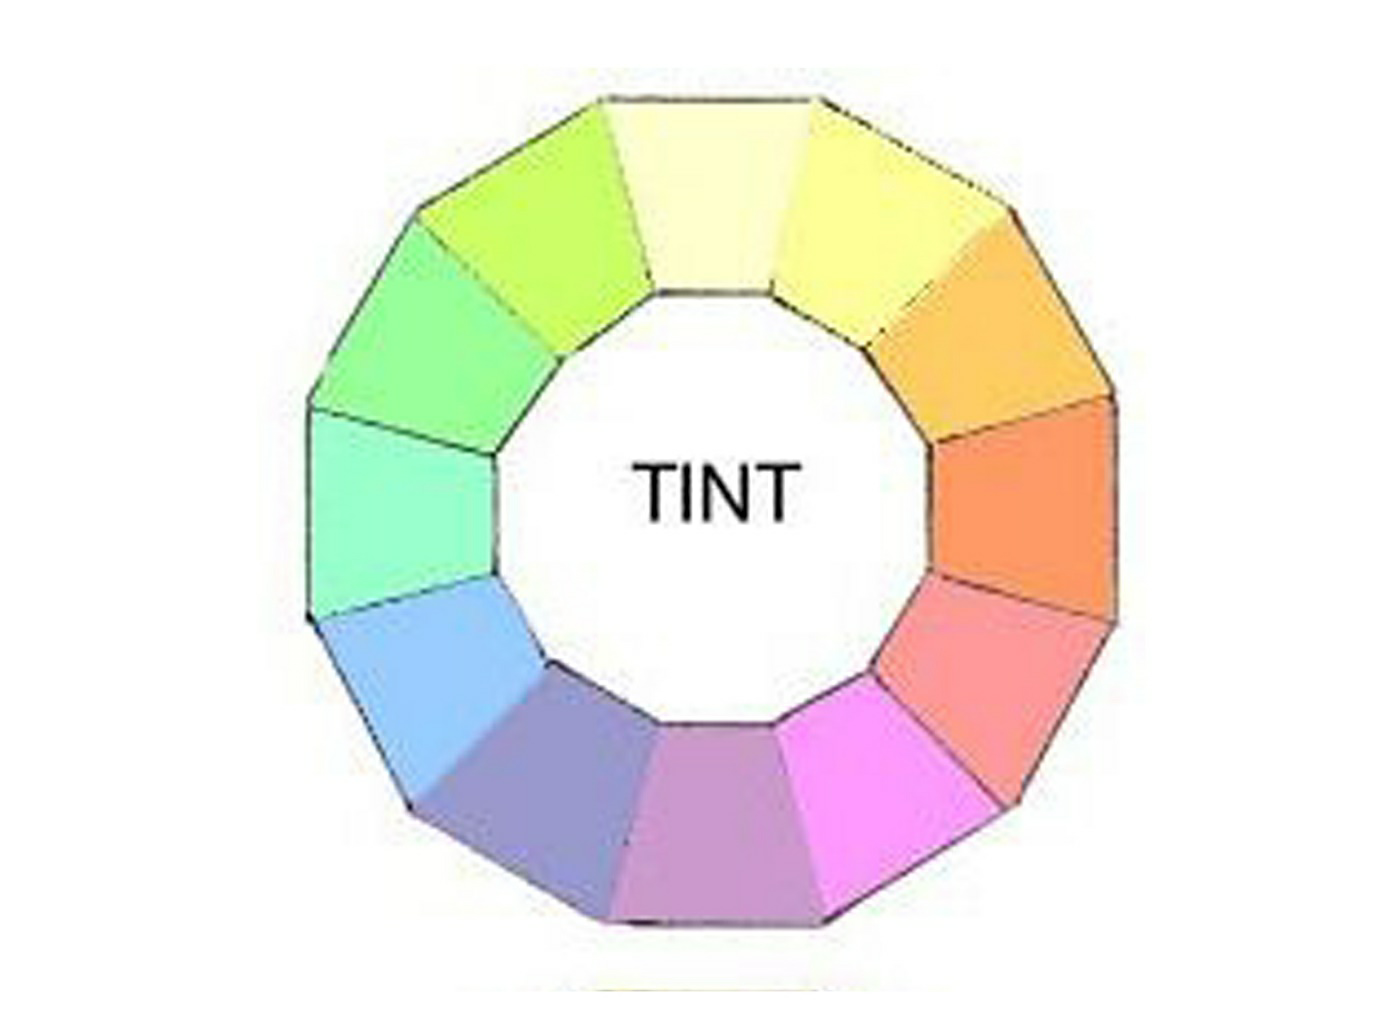
The same effects can be applied in digital media to give you different values of colour. When white is added to a colour it is said to be a tint and make the colours lighter.
When black is added to a colour you get a shade of that colour.
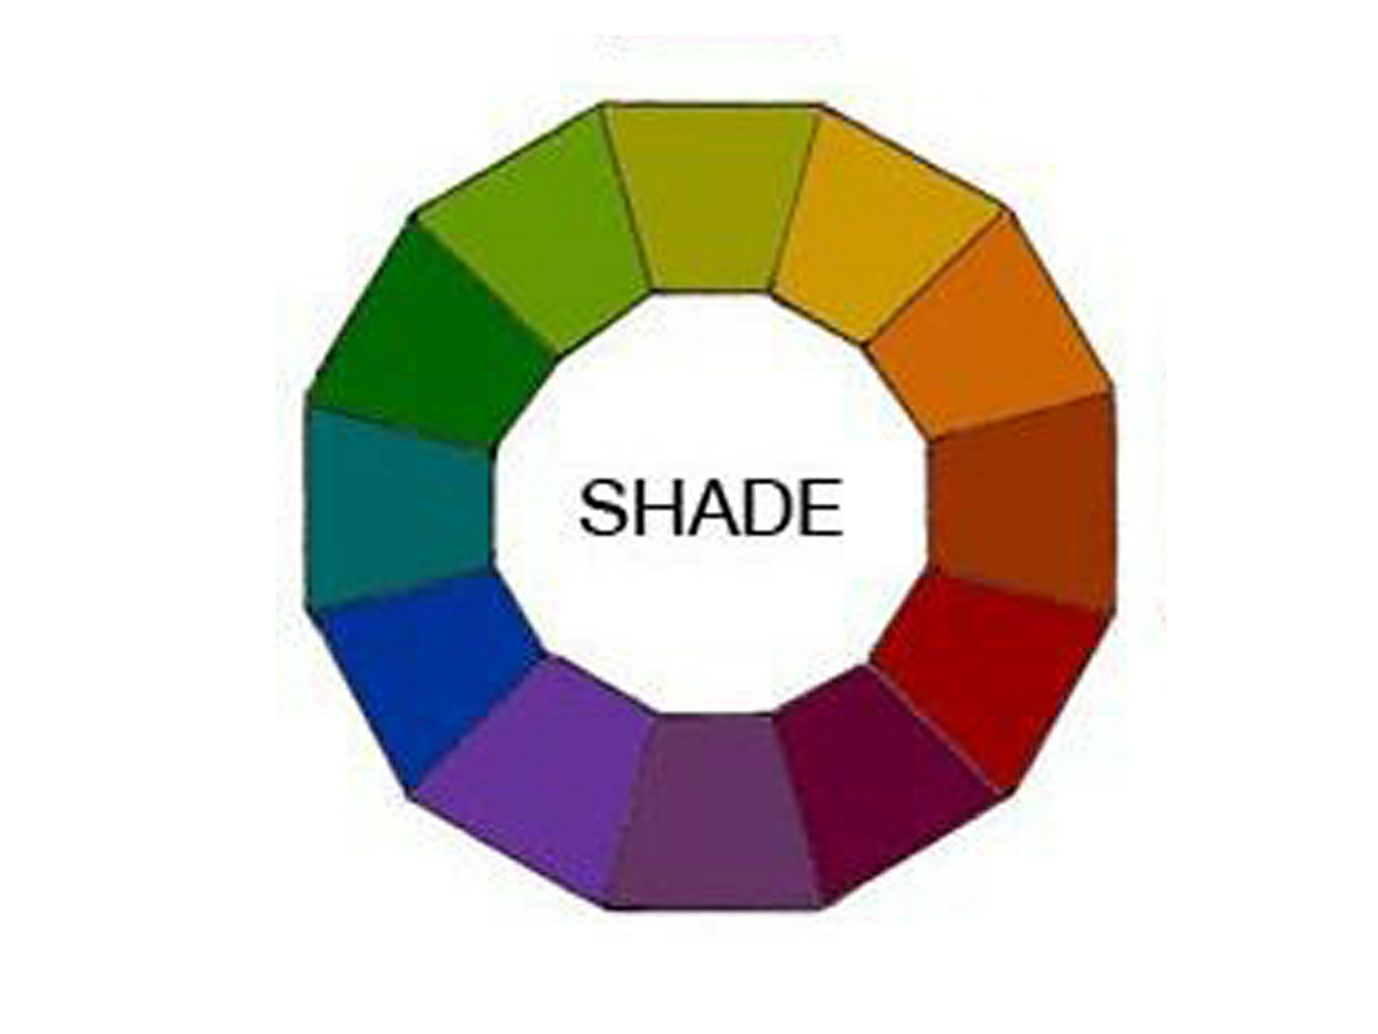
when grey is added you have different tones of that colour.

Sometimes you will hear colours being referred to in its tonal range. This means a range of greys from black to white and everything in between for a specific colour.


Hue saturation
The hue saturation colour model is a great way of choosing colours and adjusting their colour properties so that you have flexibility in choosing the exact colour you want.
Other common terms used are brightness and lightness. Brightness defines how much light an object is emitting, and lightness defines how light or dark the value is compared to other like objects.
If an object has a high brightness, then it emits a higher concentration of light. In a similar way, a low brightness means that its darker in nature because it does not emit as much light. The lightness or darkness of colour refer to how high or little these values are.
Again, each one of these properties can be adjusted in just about any graphic design software so that you can pinpoint the exact colour that you are going for.
The final thing that is important to mention is contrast. Contrast is the difference in hues, saturations, values, or brightness. Colours that have a higher contrast property, means that property is further away from each other. Take example the following colours:
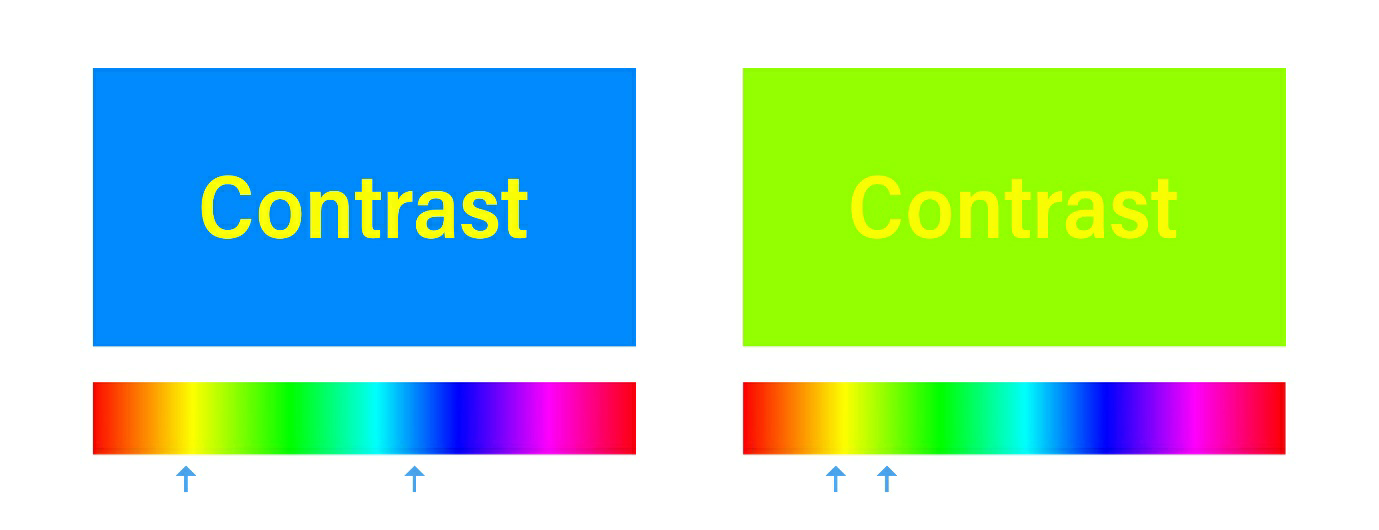
The colours on the left have a higher contrast in their hues than the colour on the right. Or, look at the contrast in the same saturation values of the following two colours on the left, versus the two colours on the right.
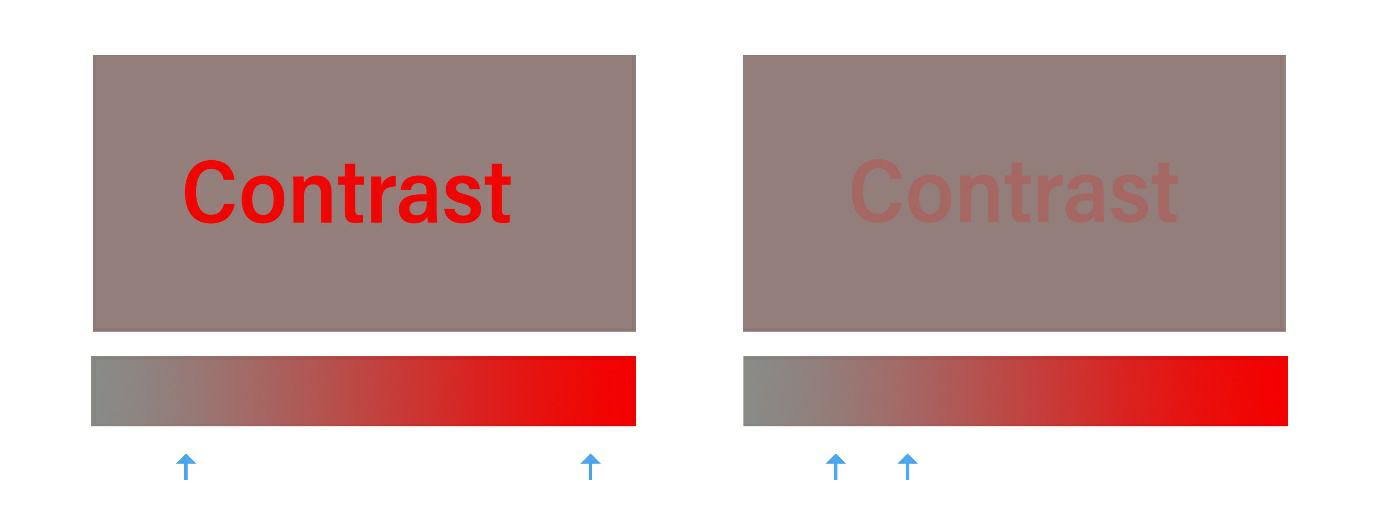
The image on the left the contrast is on its colour values where the image on the right the values are to closer together providing low contrast.
Providing high contrast in a design can help make the elements stand out or giving a low contrast can help the elements blend more. One of the biggest mistakes I see in design on a constant basis is when a low contrast is used for a design that desperately needs a high contrast.
Sometimes you might want a less contrast for stylistic choice, but keep this in mind when designing that most important information generally needs a higher contrast. This is to relay the information and make it easier for the viewer to see.
These are the most common terms to define colour in design, and so you will want to become familiar with them as you begin using and experimenting with colour in your work.
Mixing colours
Now that you have a basic understanding of how colour works and the terms we use to describe colour, we are going take a look at how colour behaves and mixes to create a range of different hues.
Think back to when you were a child, did you ever get to colour with paints?
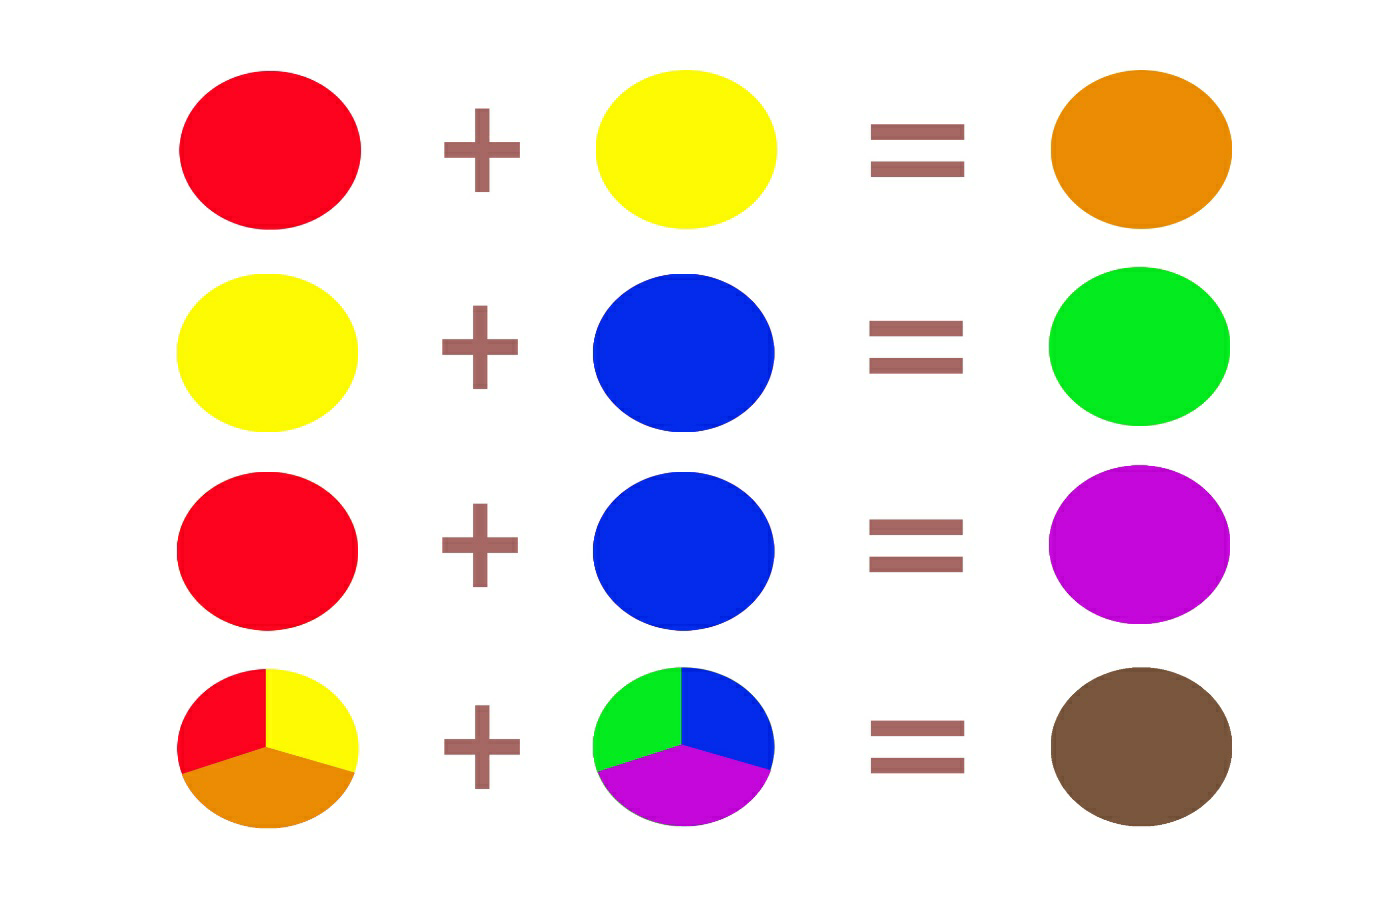
In school we were taught that by mixing different colours paints together you can get another colour. Mix red and yellow to get orange, mix blue and yellow to get green, mix red and blue to get purple and then mix them all together to get some sort of muddy colour that resembles maybe a brown.
Although this is a great way to think about the way mixing colour works, it is not how it operates, when we begin talking about digital design or design for print media.
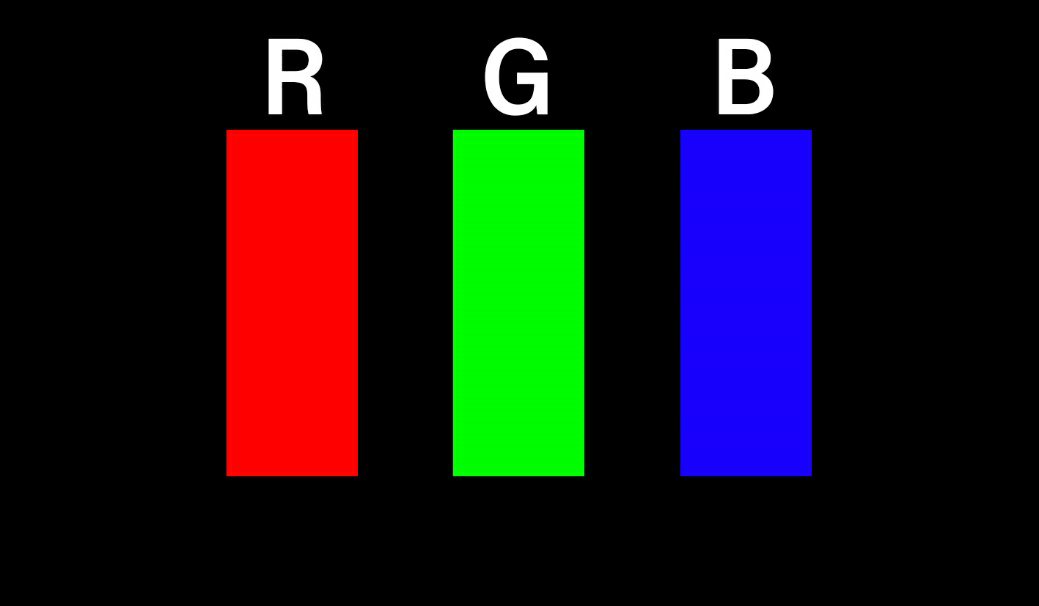
You know by now that the light that comes from the sun contains all of the wavelengths four colours. We see colour when that light absorbs into an object and bounces certain wavelengths back to us. Although we see a full spectrum of colour from red, orange, and yellow to green blue and violet our eyes and our brains actually process this information a little differently. The eyes are made up of three distinct different cones process short medium and long wavelengths to formulate the colours we see. Without going into much information on this process specifically keep in mind that red, green, and blue or RGB. This colour model was created to hack the way we typically see colour, by using these 3 colours we are able to fool the brain in to seeing all of the colours that we would like.
So how does this work? Light of these three colours can be mixed to produce all of the variations of colour.
Although the sun is the brightest light in our solar system, we can also use other lights like flashlights or LEDs to produce coloured light. In the following example think of the colours been used as beans of coloured light.
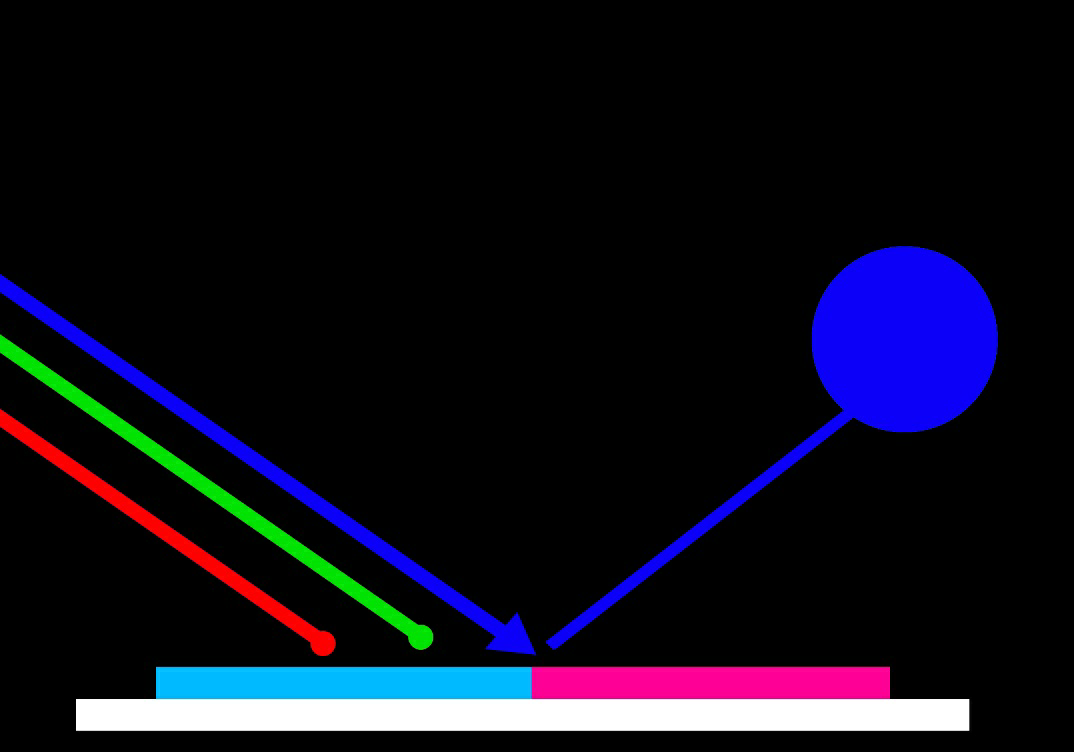
Let us start with the blue light.

The coloured blue light is shown above. All the other colours are being absorbed and the blue light is reflecting into your eye. It is being stimulated by the cone to produce colour information in your brain. Also remember that wherever you see black that is the absence of colour and not a colour itself, even though it is referred to as
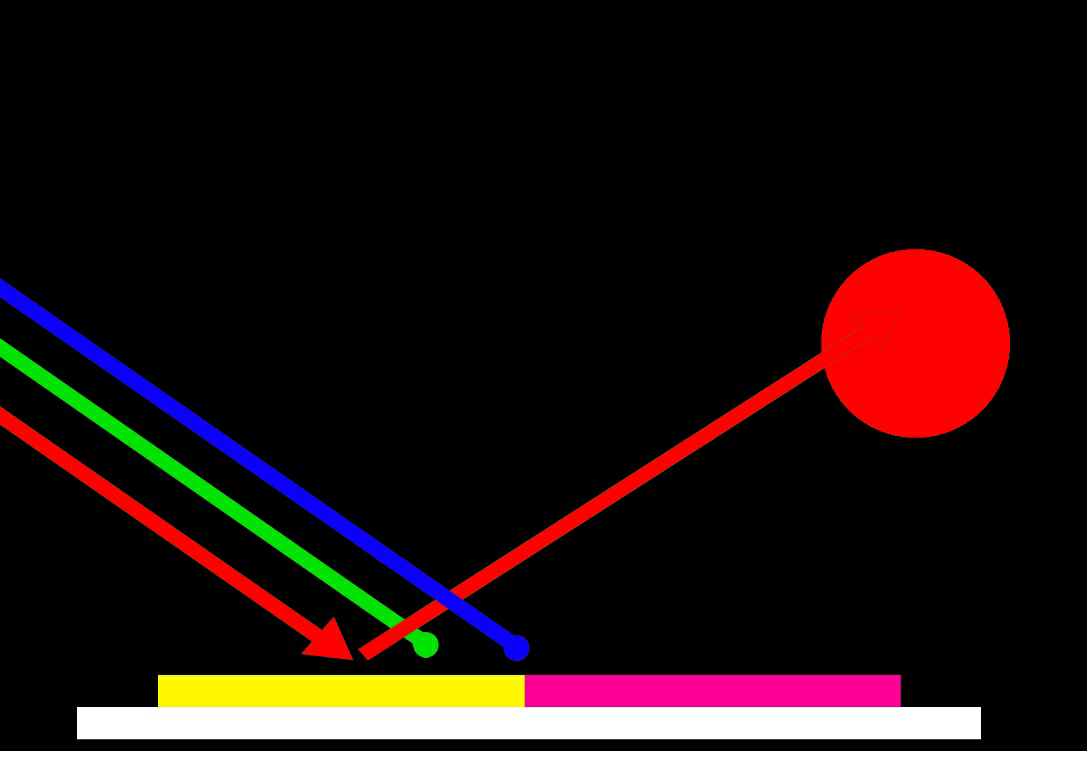
black just to give it a label. Now let us add red light.
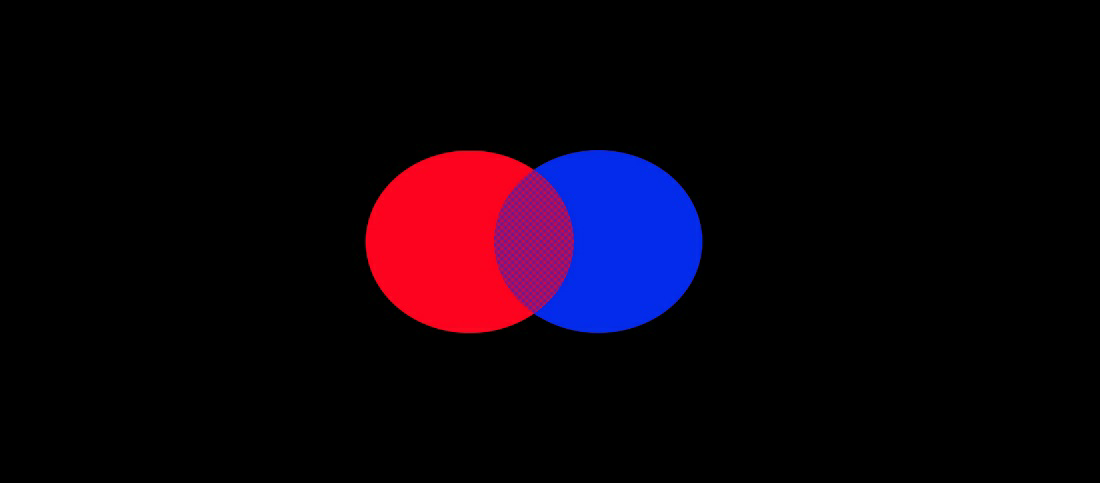
Again, that red light is just the colour wavelengths that your eyes are picking up. what happens when we mix this too? As you can see the blue and red light combined to create a magenta colour, and your brain is interpreting this blue and red wavelengths to fill in the information and create this third colour.
This coloured light can fool the brain into thinking it is seeing a magenta colour because of the cones in your eyes reacting to the blue and red. This becomes apparent when you zoom in to see multiple lights of red and blue light dots laid side by side.
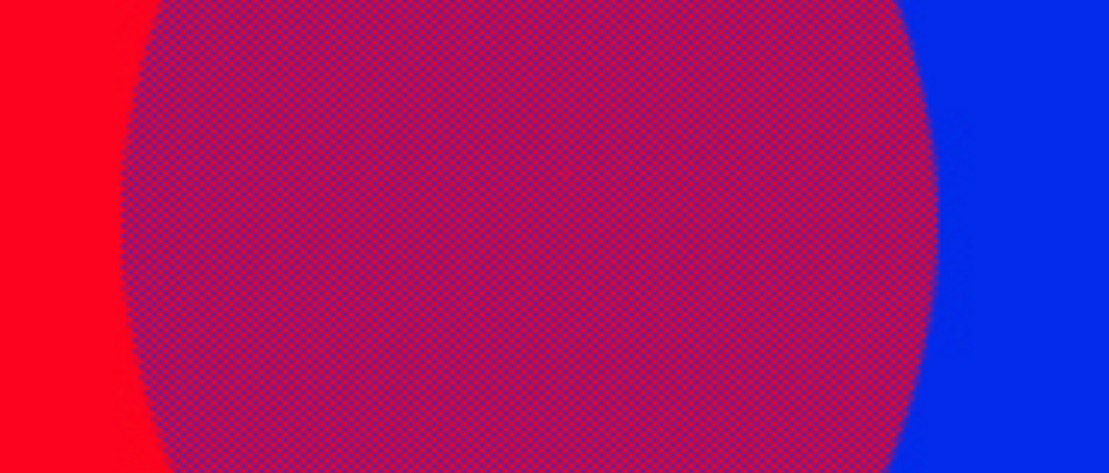
There is no magenta colour, and these colours are not overlaid over one another, yet we see a magenta when we zoom out. This is because of the way our eyes and our brain are behaving.
This is exactly how computer screens work, although you see a bunch of colours on the computer screen it is only made up of red blue and green lights.
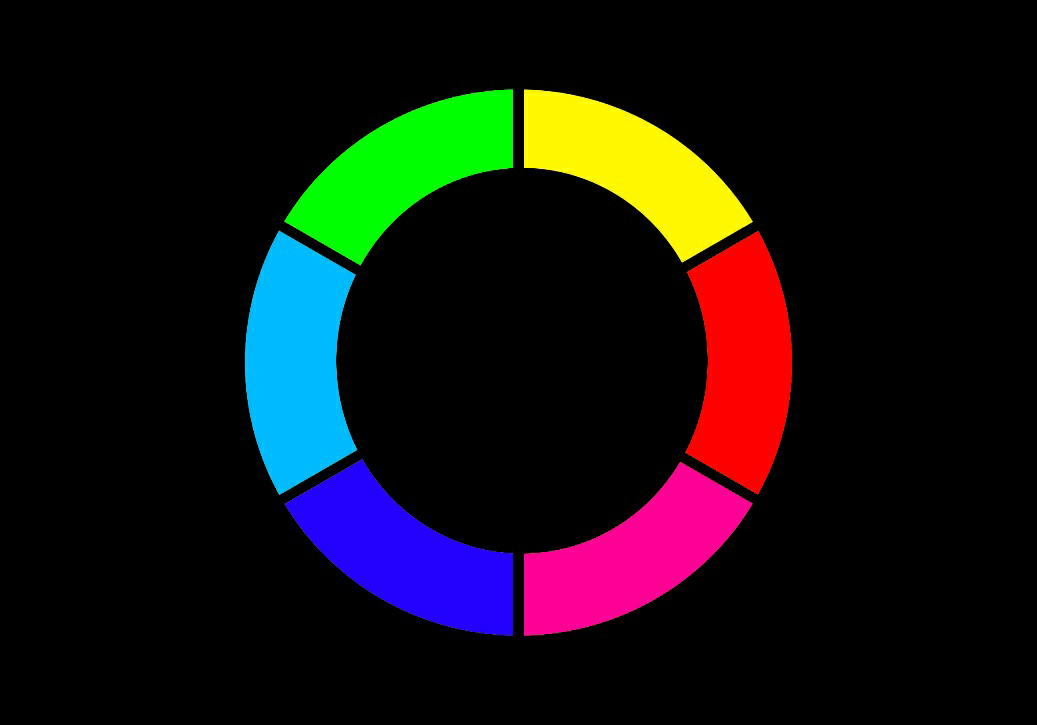
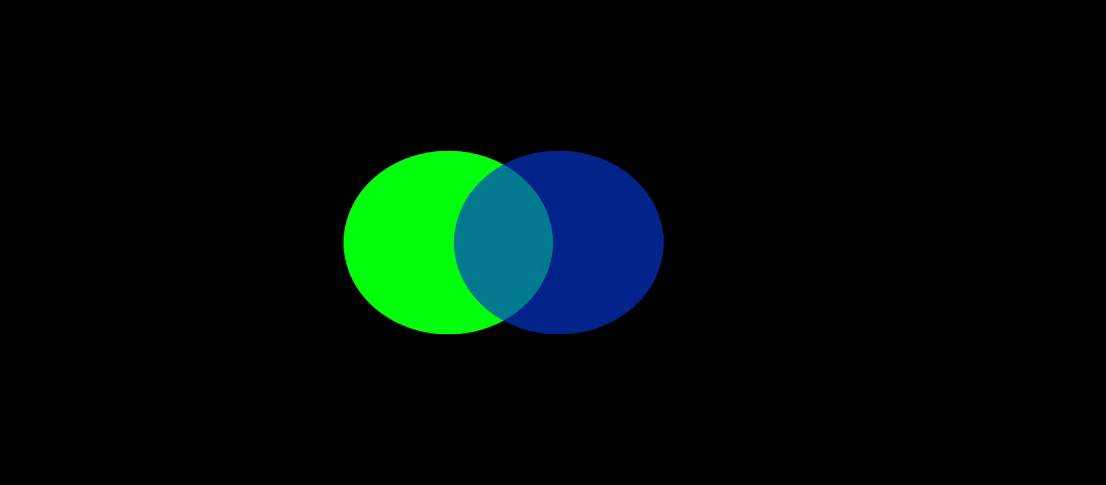
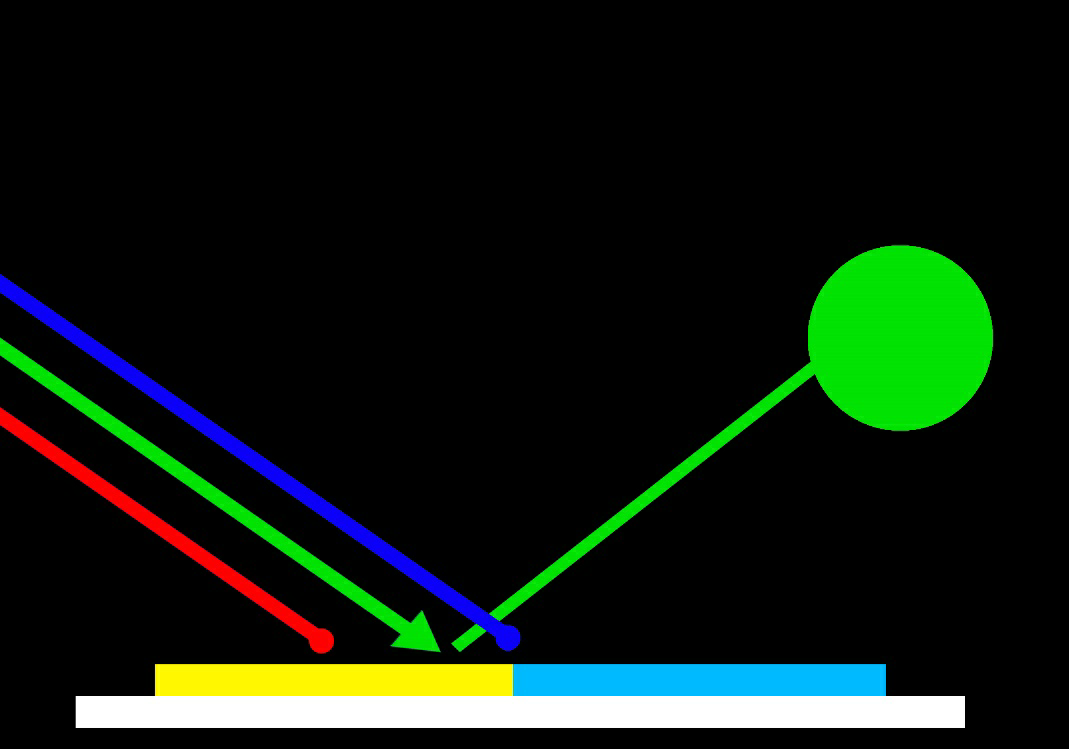
Let us look at the other colours used on the RGB model. We know that blue and red create magenta and if we mix blue and green, we can see it makes cyan.
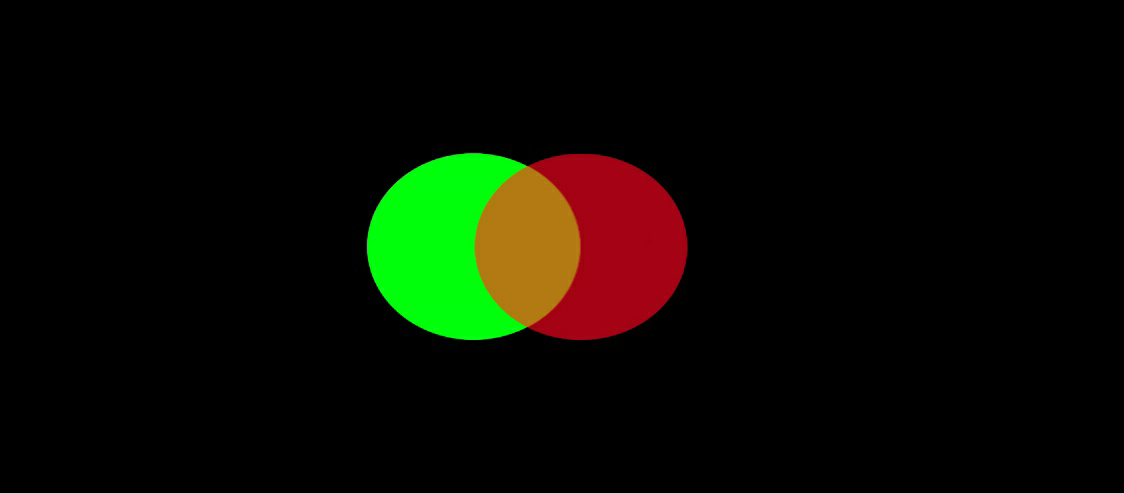
And red and green make yellow.
By adding different levels of red green and blue you can recreate every colour on the colour spectrum. Since we are talking of light you also know that wherever there is no colour being reflected. We get black and wherever all the colours mix and reflect together we then get white.
This is called an additive colour system because the colours are based on lights being added together to create all the colours.
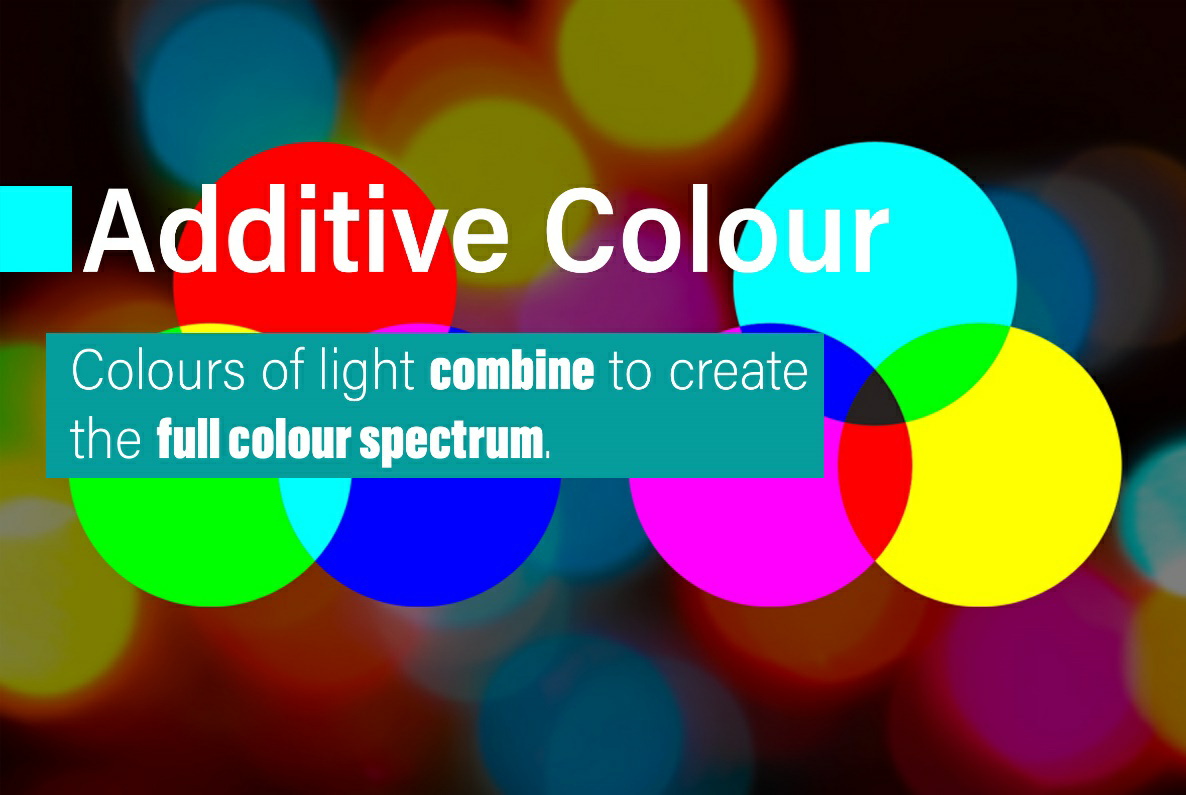
Additive colour is great for anything that uses light such as computer monitors tablets television LED panels and so on. Understanding the RGB and additive colour models will help you when selecting and modifying colours because now you know exactly how it is working.
So, what about things that do not use lights like printing media? Think back to a time that you might have changed the ink of a printer before?
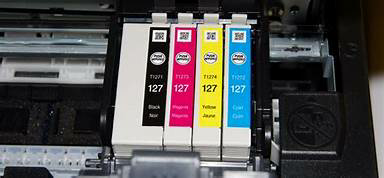
Notice that is not using the red green blue system, it is using the opposite colours of cyan magenta and yellow or CMY.
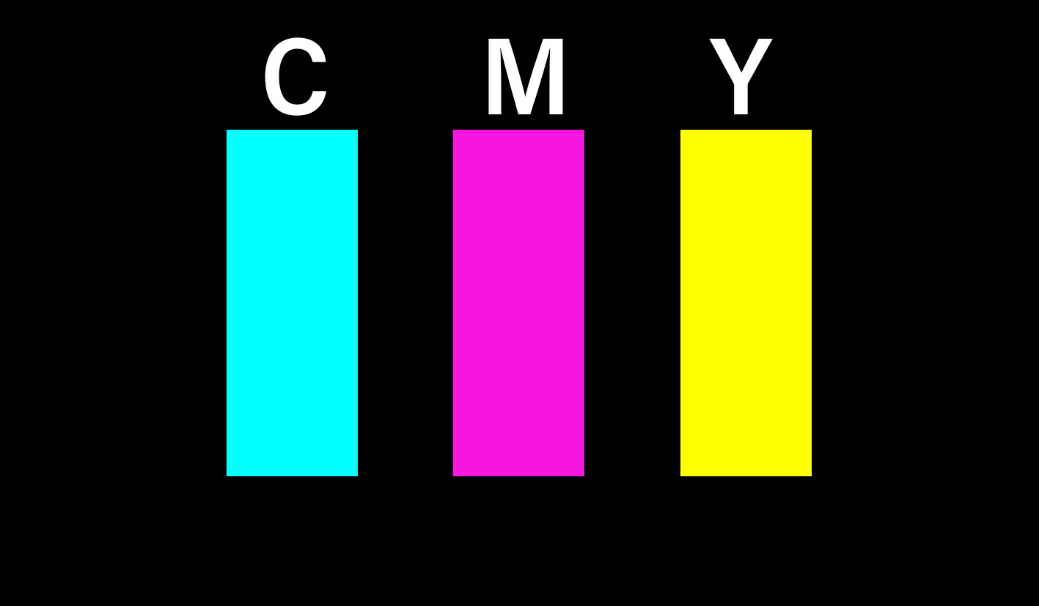
That is because this is what it is called, a subtractive colour system.
The subtractive colour system works by colours being absorbed into the object or substrate. To make it easier to understand let’s use the example of a printer printing on a white piece of paper.
When the cyan cartridge lays pigment onto the paper the red colour is being absorbed and the blue and green colours are being reflected.
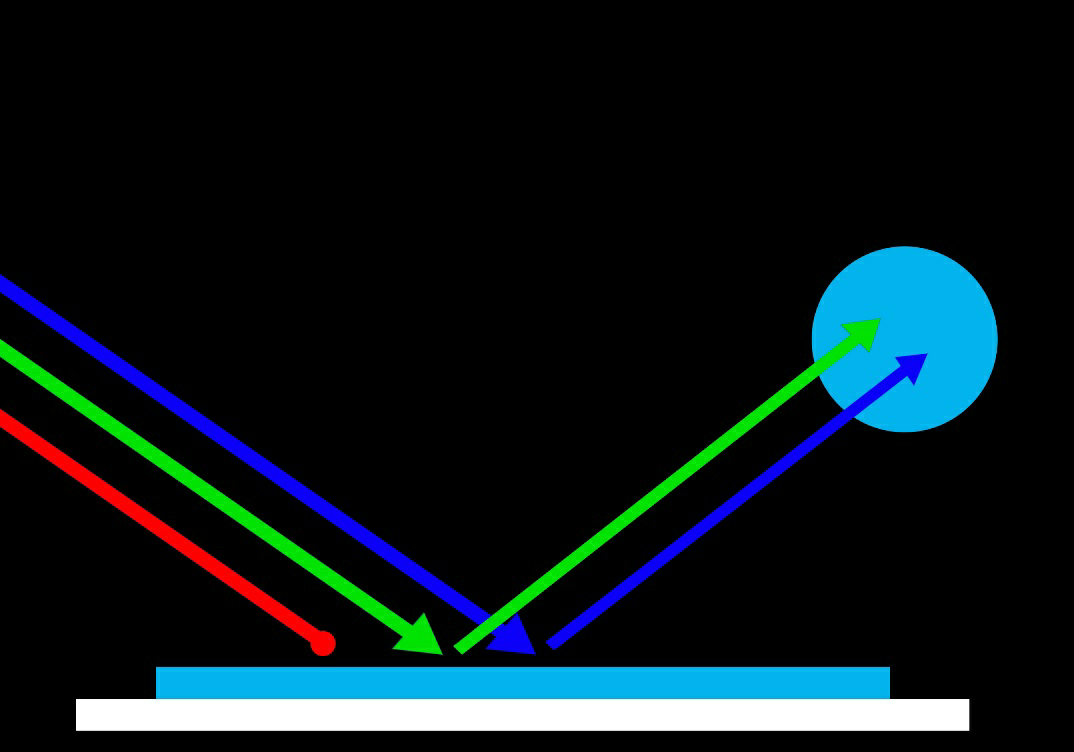
The blue and green colours mix, and, in our eyes, we see a cyan colour, because of the subtraction of the red colour we get the name of the subtractive colour model. If you look at the colours across from the CMYK colours on the colour wheel you can easily make out what colours are being absorbed.

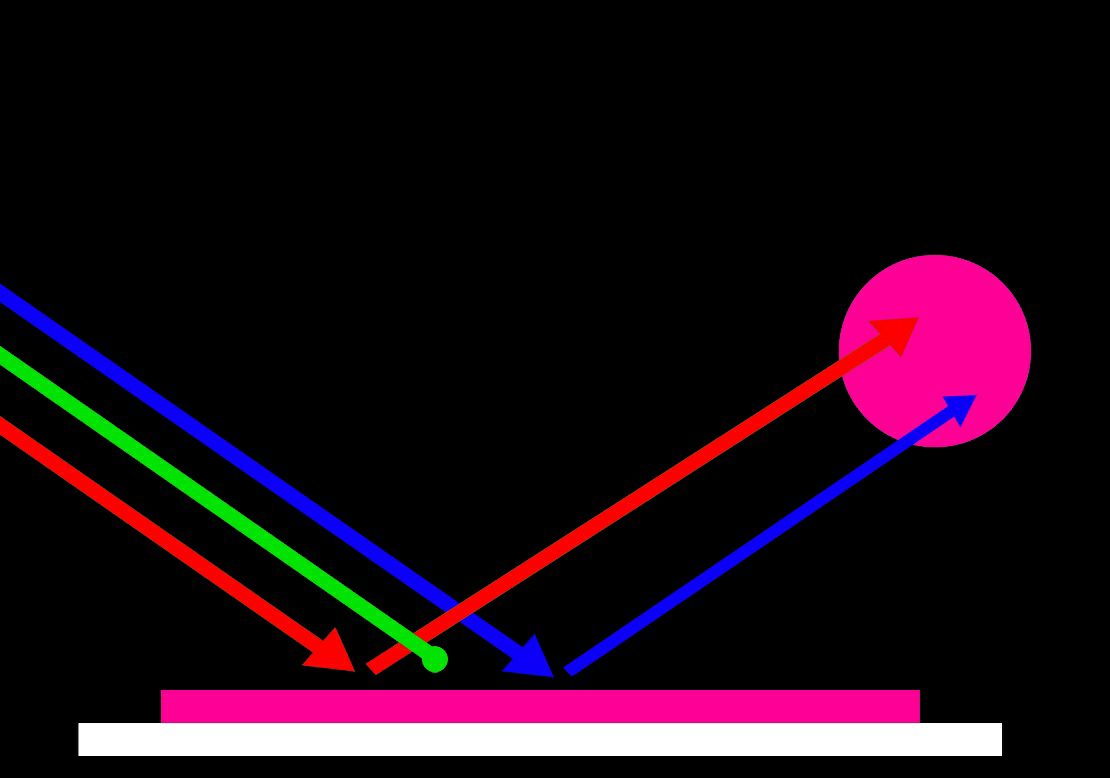
Magenta reflects red and blue so green is absorbed.
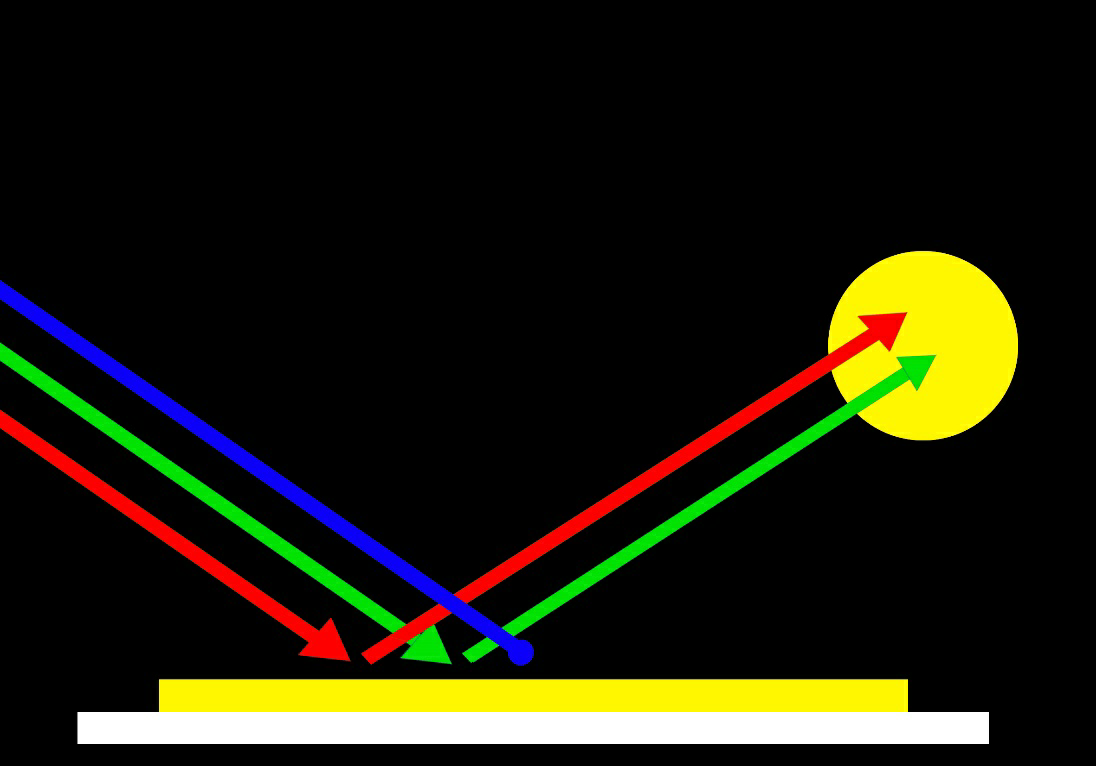
Yellow reflects red and green so blue is absorbed.
So, what about the other colours?
By mixing cyan, magenta, and yellow you can make all the other colours absorb yet reflect just the colours you would like them to reflect. As it is now known cyan absorbs red, and magenta absorbs green. By laying cyan and magenta together red and green are absorbing and so blue is the only colour reflected.
That means that magenta and yellow will absorb green and blue reflecting red.
Cyan and yellow will absorb red and blue reflecting green.
By mixing the subtractive colours together you can get the full spectrum of all available colours. However, mixing all the colours do not produce a good looking black as mixing colours of light makes a nice-looking white, instead you get a muddy colour when mixing these pigments.
To compensate for that a fourth colour black is added to darken and tone the image. Therefore you often hear of as CMYK and the ‘K’ stands for key or the black pigment.
Once you understand the way that these two-colour models work, the additive and subtractive colour models you can begin using them to your advantage.


